Static website hosting with nginx on EC2
This article walks through how to set up a simple web server to host a static website with nginx on EC2.
All the examples are drawn from my experience building this very website, from creating the static files and setting up the server to registering a domain and enabling HTTPS.
Table of content:
- Creating the static files
- Setting up the server
- Registering a domain and routing traffic to the website
- Setting up HTTPS
1. Creating the static files
For the purpose of this example, we will be generating and managing static files using Jekyll.
Jekyll is a static website generator. It helps you separate layout and content in html and Markdown files respectively, and compiles everything down to a ready to deploy website.
The project’s README states the philosophy:
Jekyll does what you tell it to do — no more, no less.
It doesn’t try to outsmart users by making bold assumptions, nor does it burden them with needless complexity and configuration.
Put simply, Jekyll gets out of your way and allows you to concentrate on what truly matters: your content.
A popular alternative is Hugo. I decided to go for Jekyll because I am familiar with the template system, and I happen to like the default theme. Plenty of free and open source themes are available for both Jekyll and Hugo, so feel free to pick a different one.
Installing Jekyll & setting up the project
First, let’s make sure we have a recent version of ruby installed:
$> ruby -v
ruby 2.5.0p0 (2017-12-25 revision 61468) [x86_64-darwin16]
Ruby >= 2.2.5 is required for Jekyll.
To update, install rvm, the ruby package manager:
$> curl -L https://get.rvm.io | bash -s stable
$> rvm install ruby-2.5.0
$> rvm --default use 2.5.0
We can now install Jekyll, as well as bundler to help build and run the development server:
$> gem install jekyll bundlerSet up the directory structure:
$> jekyll new romainstrock.com
$> cd romainstrock.com
$> bundle exec jekyll serve
Development server listening on http://localhost:4000
Browse to http://localhost:4000
The website layout is set up. We will soon add content, but first let see how to import the theme layout into the project. This will enable easy editing of the layout files to fit our purpose.
By default, the theme is “hidden” inside a ruby gem.
Let’s find out where the actual theme files are hidden:
$> bundle show minima  # minima is the default theme
/usr/local/lib/ruby/gems/2.5.0/gems/minima-2.1.0
copy over the files:
$> cp -r /usr/local/lib/ruby/gems/2.5.0/gems/minima-2.1.0/* .Finally, we need to adjust the project settings, as described in the official documentation:
- Open
Gemfileand removegem "minima", "~> 2.0" - Open
_config.ymland removetheme: minima
You may want to tweak the project metadata further by editing _config.yml, e.g website title, author, description, etc.
Creating a landing page
For example,

Open index.md and set the landing page metadata:
---
layout: home
title: Romain Strock
description: Personal webpage & blog
---
The important bit is the layout. It describes the name of the html file used to render the page.
_layouts/home.html looks something like:
---
layout: default
---

<div class="home">
    {{ content }}
</div>
The content variable is fed from the text below the header in index.md, e.g:
---
layout: home
title: Romain Strock
description: Personal webpage & blog
---

This text will be available via the content variable.
Run the server again. Going forward, the server will update itself whenever a file changes.
$> bundle exec jekyll serveThe task of modifying the layout is left as an exercise for the reader. Take your time and tweak the templates to match your expectations.
Live demo: romainstrock.com
Next, let’s create the blog.
Setting up a blog

For the purpose of this example, a blog is:
- an index page introducing the blog and listing existing posts,
- a collection of posts.
With Jekyll, there are two main ways to create posts. One way is to add posts to the _posts directory.
This is the common way to define posts,
however a main drawback is that post names need to follow the following strict convention:
YEAR-MONTH-DAY-title.md
At build time, posts are expanded into _site/posts/<YEAR>/<MONTH>/<DAY>/<title>.html. This is unfortunate because
it forces us to include the date in the url.
When using a Jekyll server, like our development server, it is possible to overcome this limitation by setting
permalink: <title>.html in the post metadata. However, in this example we are relying on the output html structure
because our web server will only serve static files - without running Jekyll.
A better way to structure a blog is to use collections.
Add a new collection to your project in _config.yaml:
collections:
  blog:
    output: true
Then create a folder _blog which will hold the blog index and the posts.
The blog index is the page that will be rendered when the “naked” /blog/ url is requested.
Create the file _blog/index.md:
---
layout: blog
title: Machine learning, AI and tech
description: Blogging about Machine learning, AI and tech.
permalink: /blog/
---
The key now is to create a new layout file _layouts/blog.html, making use of the content and listing
all the existing posts.
---
layout: default
---

<div class="home">
  {% if page.title %}
    <h1 class="page-heading">{{ page.title }}</h1>
  {% endif %}

  {{ content }}

  <!-- Loop over the existing posts -->
  {% if site.blog.size > 1 %}
    <h2 class="post-list-heading">{{ page.list_title | default: "Posts" }}</h2>
    <ul class="post-list">
      {% for post in site.blog %}
      {% if post.url != '/blog/' %}
      <li>
        {% assign date_format = site.minima.date_format | default: "%b %-d, %Y" %}
        <span class="post-meta">{{ post.date | date: date_format }}</span>
        <h3>
          <a class="post-link" href="{{ post.url | relative_url }}">
            {{ post.title | escape }}
          </a>
        </h3>
        {% if site.show_excerpts %}
          {{ post.excerpt }}
        {% endif %}
      </li>
      {% endif %}
      {% endfor %}
    </ul>

    <!-- Optional RSS feed -->
    <p class="rss-subscribe">Subscribe <a href="/feed.xml">via RSS</a></p>
  {% endif %}
</div>
Live demo: /blog/
Let’s now create a post.
Create a new file named _blog/<post-url>.md, e.g _blog/static-website-nginx-ec2.md
---
layout: post
title:  "Static website hosting with nginx on EC2"
description: How to host a simple website & blog with nginx on EC2
date: 2018-02-10
---

Let's find out.
The default layout at _layouts/page.html is quite good, but feel free to modify it.
Live demo: current post
Now that the website is ready, let see how to deploy it to an EC2 instance.
2. Setting up the server
In this section, we will demonstrate how to set up an nginx server, on ubuntu, running on an EC2 instance.
Configuring an EC2 instance
This section assumes that you already have an AWS account, and the rights necessary to start new instances.
I won’t go through the details of starting an EC2 instance, but here are the key points:
- Latest Ubuntu AMI
- Instance type: t2.nano, the cheapest machine available on EC2 (512 Mib ram, 1 virtual CPU), under $5 a month.
- Create a security group. More details below
- Optionally, you can attach an IAM role to this machine to give it some rights, e.g access to S3 without the need to specify credentials.
- Important: create a new SSH key pair, or use an existing one if you are sure you have access to this key.
The security group is important. It is basically a way to white list entries on the firewall of the instance, i.e open ports to the outside world.
Here is the security group config I recommend:
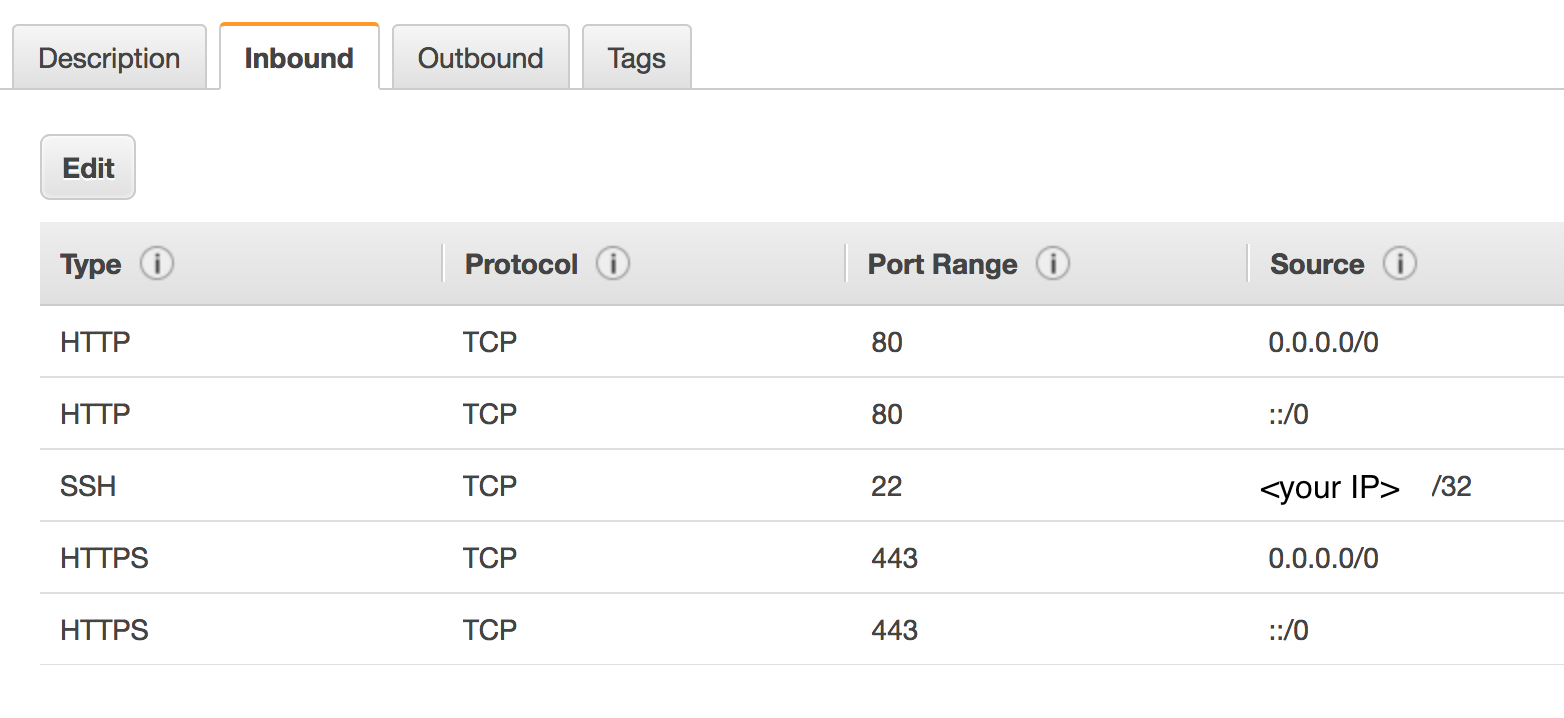
The idea is to open the port 80 and 443 to allow incoming HTTP and HTTPS traffic (respectively), and the port 22 for SSH access. Note that port 22 is open to a single IP only, so that only you can access it. The drawback is that you will have to revisit this setting often if you use a dynamic IP.
I am not quite sure why the interface shows 2 entries for ports 80 and 443. Only one entry per port is needed, with value 0.0.0.0/0.
If you messed up one of these steps, don’t worry, all you have to do is terminate the instance and start over.
Start the instance and wait for it to finish initializing.
Next, we need to assign a persistent IP to this machine. To do so, we will be using what Amazon calls elastic IPs.
They are easy to allocate from the EC2 dashboard, so go ahead and do it. Then assign it to your newly created instance.
The advantage of using an elastic IP as opposed to using the instance original public IP is that the former is static and can easily be re-allocated to another instance if this one were to be terminated (either by you or if Amazon decides to kill it as it may do sometime). This way, we can safely attach a DNS A record to this IP to route traffic to the instance without fear of having to change it later if the instance dies. We will discuss it in greater details in the 3rd section.
Now that our instance is up and running, let’s ssh in and start configuring it.
You will need the instance ssh private key and the instance IP handy to connect:
$> ssh -i <instance-ssh-private-key> ubuntu@<IP>When asked if you want to continue, say yes.
On the instance, we need to install nginx as well as a few more packages to deal with S3, which we will use to store the website code:
ubuntu@ip $> sudo apt-get update  # let's make sure we know about recent package versions
ubuntu@ip $> sudo apt-get install nginx  # Install nginx
ubuntu@ip $> sudo apt-get install python-pip python-dev build-essential  # Install python & pip
ubuntu@ip $> sudo pip install --upgrade pip  # update python's package manager
ubuntu@ip $> pip install awscli --upgrade --user  # Install AWS command line tool
The instance is now configured. All that is left is to deploy the website’s code to the server and to configure nginx to serve the files.
Deploying code to the server
The easiest way to deploy the code is to copy the files over ssh to the server, e.g:
$> scp -i <instance-ssh-private-key> -rp _site/ ubuntu@<IP>:/home/ubuntuThis is an OK solution for a website that does not need to be updated very often. However I decided to use a variation using S3 because it is a bit cleaner and it also makes it easy to automate the delivery process later on.
So first, let’s upload the code to Amazon S3. As for the instance, we need to make sure python and pip are installed. On Ubuntu, the step above will work. On Mac, you may want to install it with brew or a similar method.
Ubuntu:
$> sudo apt-get update
$> sudo apt-get install python-pip python-dev build-essential
$> pip install awscli --upgrade --user
Mac:
$> brew install python3
$> pip3 install awscli --upgrade --user
Then let’s go ahead and create deploy.sh:
#!/bin/bash

# Build the website for production
JEKYLL_ENV=production bundle exec jekyll build

# Sync all the built files to a bucket on S3.
pushd _site
aws s3 sync --exact-timestamps --delete . s3://<your-bucket>/
popd
Note: You may need to configure aws cli with your AWS credentials by running aws configure.
Change the script permissions and run deploy.sh:
$> chmod 775 deploy.sh
$> ./deploy.sh
All the files should now be in the bucket.
Next, let’s SSH again into the instance and retrieve the code from the bucket:
ubuntu@ip $> mkdir <website-name>
ubuntu@ip $> aws s3 sync --exact-timestamps --delete s3://<your-bucket>/ <website-name>/
Note: if you did not set an IAM role for this instance, you will need to configure the aws cli by running
aws configure.
Now, every time you want to update the code, all you have to do is re-run deploy.sh, then
SSH into the instance and sync the files.
One latent advantage of this approach is that it is easy to modify the deployment process to automatically sync the files when the content changes on S3. For example, after building the code, we can create a checksum file and upload it to S3 with the rest of the content.
deploy.sh:
#!/bin/bash

# Build the website for production
JEKYLL_ENV=production bundle exec jekyll build

# Add checksum file
# Note: on linux, replace md5 with md5sum
tar c . | md5 > CHECKSUM

# Sync all the built files to a bucket on S3.
pushd _site
aws s3 sync --exact-timestamps --delete . s3://<your-bucket>/
popd
Then on the instance, create a minutely cron job that checks if the checksum file has changed. If so, run the sync command again. The implementation of the cron job is once again left as an exercise for the reader.
Now that we know how to deploy code to the server, let’s find out how to configure nginx to serve the files.
Configuring nginx
First, let’s list the requirements:
- On the server, the directory
<website-name>/is the root of the website. All the links are resolved from it. We will need to let nginx know about it. - We want to be able to accept incoming HTTP traffic from port 80 (We will see in the last section how to extend the configuration to support HTTPS on port 443).
- We want
http://<domain>/to serve index.html - We want
http://<domain>/blog/to serve the blog index page - We want
http://<domain>/blog/<post-title>.htmlto serve the correct page. - We want to be able to serve assets with the correct content-type.
- Everything else returns an HTTP error 404 Not Found
nginx.conf:
worker_processes  1;  # The instance is small, 1 process is enough.

error_log  /var/log/nginx/error.log info;  # Error log, level info or greater
pid        /var/run/nginx.pid;  # nginx process ID

events {
  worker_connections  1024;  # Max number of simultaneous connections.
}

http {
  # Access log: requests hitting your website.
  access_log         /var/log/nginx/access.log;

  # Let nginx infer content types automatically.
  include            /etc/nginx/mime.types;

  # "sendfile allows to transfer data from a file descriptor to another directly in kernel space.
  # sendfile allows to save lots of resources [when serving static files]"
  # Quoting https://thoughts.t37.net/nginx-optimization-understanding-sendfile-tcp-nodelay-and-tcp-nopush-c55cdd276765#8e26
  sendfile           on;

  # Keep connection alive for no more than one minute
  keepalive_timeout  60s;

  # Automatically gzip the output, except for IE 6 clients (hopefully rare)
  gzip on;
  gzip_disable "msie6";

  # Set website's root
  root /home/ubuntu/<website-name>;

  # Create a web server
  server {
    listen 80;  # Listen on HTTP port 80

    # Cache assets for 5 minutes.
    add_header Cache-Control max-age=300;

    # Configure 404 page.
    error_page 404 /404.html;

    # Route / to index.html.
    location = / {
      try_files /index.html =404;
    }

    # Route Blog index url.
    location = /blog/ {
      try_files /blog/index.html =404;
    }

    # For everything else, try to find a file matching the path or return a 404.
    location / {
        try_files $uri =404;
    }
  }
}
All that is left is to upload this file to the server, e.g via scp:
$> scp -i <private-key> nginx.conf ubuntu@<IP>Then SSH to the server, copy the config file to the right place and restart nginx.
ubuntu@ip $> sudo cp nginx.conf /etc/nginx/
ubuntu@ip $> sudo service nginx restart
If something went wrong with the config, you can debug it by running:
ubuntu@ip $> systemctl status nginx.service
 nginx.service - A high performance web server and a reverse proxy server
   Loaded: loaded (/lib/systemd/system/nginx.service; enabled; vendor preset: enabled)
   Active: **active (running)** since Sun 2018-02-11 02:16:06 UTC; 17h ago
 Main PID: 21982 (nginx)
 ...
If this command shows that the service is running, we are now ready to test it.
Browse to http://<IP>/
You should see your website in all its glory.
3. Registering a domain and routing traffic to the website
Now that we are serving the website, we want to purchase a domain name and direct the traffic to the server. This is a short section, I will mainly point to various useful resources.
I personally like to use Gandi. But there are dozen of other registrars available.
After purchasing a domain, we need to let DNS servers know where to find our server. This is done by adding
a A record DNS entry.
How to set a DNS record will vary depending on your registrar. The documentation for Gandi is here.
You’ll need to input the following:
- Type:
A - Name:
*for naked domains (http://romainstrock.com) or input the subdomain, e.gwww - Value: IP of the server
- TTL (time to live): 3 hours or so (i.e no need to re-validate the value more than every 3 hours)
Wait a couple of minutes and you should be able to access the server via the domain name. If the domain used to have a A record pointing somewhere else then it may take longer (up to 48h).
We’ve successfully set up an HTTP server accessible via a domain name, and serving static files.
Last but not least, we need to set up HTTPS to allow secure connections to our website.
4. Setting up HTTPS
Setting up HTTPS for a website used to be a pain, partially because certificates used to be commercial only, and also because setting it up properly is not always straightforward.
Nowadays, free certificates are available thanks to Let’s Encrypt, which brought down the cost of operating a certificate authority by automating all parts of the process. So let’s go ahead and create a certificate with Let’s Encrypt.
The documentation is here. In this guide, they recommend using certbot to easily generate a certificate from the command line.
Let’s first install certbot. On the server:
ubuntu@ip $> sudo apt-get install software-properties-common
ubuntu@ip $> sudo add-apt-repository ppa:certbot/certbot
ubuntu@ip $> sudo apt-get update
ubuntu@ip $> sudo apt-get install certbot
Then run the following command and follow the instructions:
ubuntu@ip $> sudo certbot certonlyWhen asked about domain names, specify <domain> and www.<domain>.
At the end of the process, you should receive 2 files: <domain>.key and <domain>.pem.
These files are important and a copy should be kept somewhere safe.
Finally, let see how to modify the nginx config to accept HTTPS connections using these keys.
nginx.conf:
worker_processes  1;

# ... unchanged

http {
  # ... unchanged

  # Modify the web server to listen on port 443 instead of 80 and enable SSL.
  server {
    listen 443 ssl;  # Listen on HTTPS port 443

    server_name <domain> www.<domain>;  # Specify allowed domain names

    ssl on;  # Enable SSL
    ssl_certificate /home/ubuntu/<domain>.pem;  # Path to the certificate .pem file
    ssl_certificate_key /home/ubuntu/<domain>.key;  # Path to the certificate .key file

    # ... unchanged
  }

  # Add a new server listening on HTTP port 80 and redirects all the traffic to https://*
  server {
    listen 80;
    return 301 https://$server_name$request_uri;  # Permanent redirection to the HTTPS version
  }
}
Restart nginx:
ubuntu@ip $> sudo service nginx restartYour website should now expose a very satisfying 🔒 in front of the url bar.

Wrapping up
In this article, we’ve learned:
- How to create a simple static website & blog with Jekyll
- How to deploy this website to an EC2 instance
- How to set up nginx to serve the website files
- How to register a domain and route traffic to the website
- How to set up HTTPS
If you’ve made it this far, well done!
We’ve only scratched the surface of most of the tools we’ve used, but it has been enough to build a simple website. Most of the concepts can be extended and improved, as we’ve seen for example with the automatic update of files by the server in section 2.
The source code of this website is available on Github.
Feel free to drop me an email if you have questions or comments regarding this article.